
This subcomponent allows you to run orchestrations on a defined schedule. Schedules are an unsupervised, autonomous way to call orchestrations. They are very simple to set up.
A Scheduled Orchestration can’t have inputs that rely on a 3rd party or a user taking a specific action to provide information at runtime. It must be an orchestration that can find and process the data it needs on its own.
For example, if you build a Schedule to add new customers in JDE from Salesforce every day, it should include an initial orchestration step to go into Salesforce and pull that information, then feed it into a form request to add it into JDE. It can’t be set up as a passive orchestration that simply expects the information like the customer name, address, payment terms/instrument, etc. to show up as an input.
How to Set up a Schedule
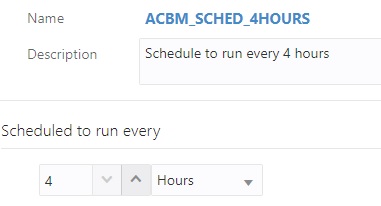
Define the name and the description based on the interval you will be using (hours, days, etc.). Select the interval from the drop down box to complete setup. That’s as simple as it gets!
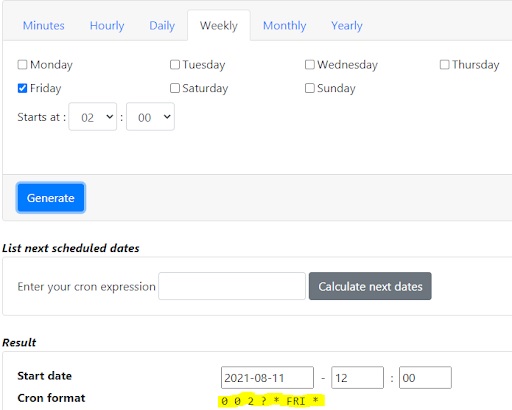
However, if you need a schedule that isn't so simple (such as Mon/Wed/Fri at 2am), things get a little more complicated. You could technically set up multiple orchestrations for specific days of the week and times of day. However, this becomes messy and difficult to maintain. The better option is to enter a Cron string in the field provided.

There are two free and easy resources for generating Cron strings:
- For most scheduling requirements, you can use Cronmaker.
- For more complicated Cron strings (such as running an orchestration on the last month of a quarter or the last Friday every other month), try FreeFormatter.
Simply use the UI checkboxes to define the schedule you want, click the generate button, copy the Cron format string, and paste it into your Orchestrator Schedule.
Using Schedules You’ve Created
Once you define a Schedule, there are two more steps to put it into action. Go to your orchestration, click start, and select the Schedule option (the little clock button). From the popup menu, select the Schedule you created from the drop down list. Now, it’s associated with the orchestration.
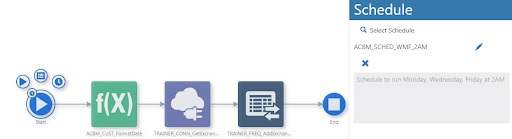
The final step is to start the Schedule running. From the Orchestrator home screen, go into Scheduler to see the full list of orchestrations that are associated with Schedules. Toggle the switch to turn the Schedule on for your orchestration. You also have the option to set it to Autostart if you want it to kick off on its own if the server is reset. Leave this switched off if there are other dependencies that need to run first before your Schedule runs again.

Final Note: Why not simply define a schedule on each orchestration? Having the Schedule as its own independent component makes it modular so you can reuse the same schedule across multiple orchestrations and notifications. Clear naming is important since you want each schedule to be easy to identify.
That concludes our overview of all the master components and subcomponents in Orchestrator. But we’re not quite finished. Our final post in this series will tie it all together by covering how to call orchestrations.

